
You can find a .pdf of this article at /assets/uploads/pdf/Hang_Glider_Tuning_and_Test_Flying.pdf
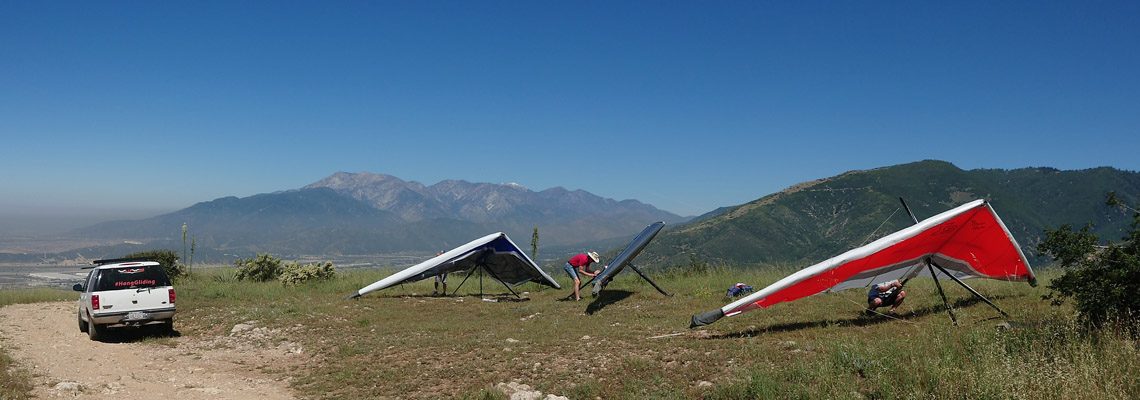
In order to be able to effectively tune your glider and evaluate tuning changes, it is essential to have a comprehensive understanding of flight test methodology and to conduct a thorough flight test of your glider before you make changes and again after each change to evaluate the effect of the change. We therefore begin with a discussion of flight testing.
The information presented here supplemental to the flight testing and tuning information in your glider’s owner’s manual, so review that information as well. You can find Wills Wing manuals at /support/manuals/
Flight testing 101
How to use an ASI
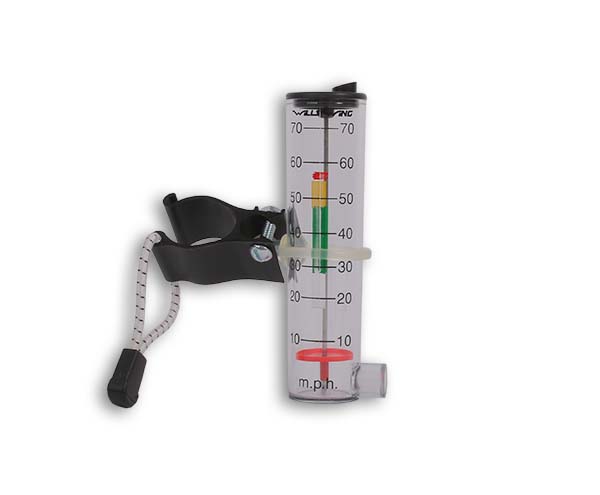
An ASI should ideally be calibrated against a known reference. If you have an integrated vario/GPS/ASI, then the easiest procedure is to make 2-way runs on a long road in calm early-morning air with the instrument as far as possible outside the flow-field of the vehicle to be free of turbulence. You need a driver for best results because it’s difficult to watch the display while driving.
If your ASI is not calibrated then be aware that your speeds are not appropriate for comparison purposes with other pilots, and that some of the performance functions of your flight computer like L/D are only relative and not absolute. For example, the indicated stall speed might be 17 on one ASI and 20 on another but even with these differences we can still compare some speeds relatively, for example “trim at 3 mph above stall”. Note that even with a calibrated ASI, the indicated ASI near stall will be a few mph slower than TAS because of the distorted flow field around the glider.
Airspeeds
There are a few speeds that we need to know and collect on every flight test. If it’s soarable then we try to record the data at least twice, especially later in the flight after the sail has relaxed and stabilized otherwise it’s not uncommon to see significant variations.
The essential speeds to be familiar with are stall speed*, minimum controllable speed, trim speed and Vd (stabilized top speed after a slow pull-in to normal pilot full-forward position), each at VG increments of off, 25%, 50%, 75% and full-tight. I also like to identify minimum circling speed. It’s much easier to acquire this data in smooth air where a precision of about 0.5 mph is possible than in typical mid-day conditions where it can be difficult to get a repeatable precision of better than 3 mph. You should also be aware of how these speeds relate to your glider performance speeds like min-sink and best-glide.
*Stall speed can be tricky to define. We like to think of it this way – the slowest speed that you can maintain indefinitely in completely smooth air, without the glider experiencing a significant loss of aerodynamic efficiency. On some gliders, in some VG configurations, you may be able to fly, and control the glider below what we think of as stall speed, but enough of the wing is in a stalled / separated flow condition that the sink rate has increased significantly. Stall speed is also not what you see on your airspeed indicator after a moderately rapid pitch up to a stall and subsequent nose down recovery response. That momentary airspeed reading will be well below any speed at which the glider will continue to fly.
For slow speeds, it’s helpful to have a few tufts on the top surface of your sail that you can observe in flight. These tufts should be positioned near the location of initial separation, typically at approximately 1/3 of the semi span out from the root, or about the middle of the crossbar, and at about 75% cord length. (On a double surface glider with an opaque bottom surface you’ll be restricted to that area behind the bottom surface to be able to see the tufts, but they will still provide valuable information.) As you slow the glider down, tufts in the area where separation is taking place will typically first begin to wiggle, then deflect towards the tip, and eventually reverse towards the nose. Depending on the glider model, a tuft may start to become active as much as 5 mph above stall speed or be well-behaved until much closer to stall. The subject of tuft testing is more complicated however it’s helpful and educational to have visual indicators of the airflow inflight. Most commonly, it’s easy to understand that if you are having lateral control problems and the tufts are active then you are flying too slow.
Another issue that is relevant to flight testing is harness configuration and hang height. You should be hanging as close to the bar as possible with no more than 2-3 inches of clearance when your body is in a level attitude, and your harness should not have a tendency to pitch head-up when you are pulling in for higher speeds. Either of those issues will severely compromise your speed range and lateral control authority.
Depending on your glider model, you should be cautious about stalling your glider for flight testing. For example, I don’t provoke hard stalls on a U2 or T2 especially at VG tight where the stall-break is relatively sharp, and I approach these speeds in active air even more carefully or even skip that entirely. On Alphas, Falcons and S3s, I’m comfortable flying at full-arms extension and even holding the nose up against the pitch-down bucking but you shouldn’t do this unless you are very familiar with your glider and recovering from unusual attitudes. You should never initiate a stall from a dynamic maneuver (commonly expressed as a whip-stall) but only from a slow reduction of airspeed of about 1 mph per 3 seconds. Stall speed is typically a little slower with VG 50% or higher but also sharper. Two characteristics to look for are premature stall and stall hysteresis. Premature stall is where the glider stalls at a higher speed / lower angle of attack than it should. This can be hard to detect if subtle if you don’t have a lot of flight experience on other examples of the same model. Stall hysteresis, which often accompanies premature stall, is when after the nose pitches down following the stall break, the bar continues to push back and the nose continues to fall until the speed is significantly higher and the angle of attack significantly lower than what it was at the onset of the stall. Both of these characteristics are typically associated with some surface irregularity in the top surface leading edge area. A crease in the mylar insert, or even in the sail material itself can be enough to set off a premature separation and delay re-attachment. Water beading up from flying in rain can do it. Some models are much more sensitive to this behavior than others.
If stall speed is the minimum steady state speed at which you can fly your glider, then minimum controllable speed is that speed at which you can make lateral corrections and shallow roll-reversals without the glider stalling and without having to speed up to regain control. This speed is more important than stall speed because it’s the slowest practical speed that is useful for any flight maneuver from take-off to landing. Minimum controllable airspeed will typically increase at higher VG settings even if stall speed is slower. Also minimum controllable airspeed is a function of pilot skill and experience, and is therefore related more to the combination of pilot and glider, as opposed to being a pure aerodynamics dependent speed.
Minimum circling speed is often closely related to minimum controllable speed but with the additional constraint of maintaining good effective performance. It’s nice if you can retain full lateral control through stall speed but that won’t be very effective for climbing unless the thermals are small and relatively strong. Also, we might find that there is more difference in the minimum circling speed with VG activation than the stall speed or other airspeed variations with VG. I think of minimum circling speed as one of my most important performance metrics and where changes like adding raked tips is most pronounced.
Trim speed is the speed the glider will fly with no pitch control input from the pilot. I typically reference trim speed relative to stall speed or other cardinal speeds like min-sink or best glide. Trim speed is often a factor in handling because gliders that are trimmed faster tend to be more responsive to lateral control, but are more difficult to climb effectively at steeper bank angles because the trim speed in a turn is higher than your target climb speed even when the wings-level trim is near stall. Although we want to collect all the relevant speeds at every VG settings, trim speed is typically the one with the most variation and is therefore important to be aware of. We call variation of trim speed with VG activation “transient trim”. Transient trim can be either desirable or unwanted depending on personal preferences, range of speeds and direction of trim change.
The final speed to check is Vd and you should approach this only in smooth air and especially cautiously if it is higher than the placarded Vne (speed never to exceed) which, under HGMA standard is typically 53mph (with a Va, or maximum maneuvering speed, of 46). As a bit of background, the airworthiness standards incorporate a safety factor in these placarded airspeeds. A glider that has a designated Vne of 53 mph has been load tested to 65 mph and would be expected to have a structural safety margin of 50% at Vne and 100% at Va. The glider will have also been shown to be controllable with stable longitudinal return-to-trim behavior within the speed range between stall and Vd, assuming that the glider is configured and maintained according to the original design specification. A 50% safety margin that is commonly associated with aircraft structures is much lower than most industrial and consumer-goods standards because of the sensitivity of additional weight to aircraft performance. So, your hang glider (or any aircraft) is not as tolerant of neglected maintenance as a vehicle, bike or a ladder that more typically will have safety margins of 300-500%. We typically test to Vd during production flight tests only at VGT, where Vd tends to be highest, and return to trim tendency tends to be lowest, but you should check your top speed in all configurations. For example, on gliders configured with active stability systems that are tight at higher VG settings, Vd may be higher at lower VG settings. Perform the test by slowly accelerating at a rate of 1mph per second until reaching the normal pilot full-forward position (as far forward as possible without balling up). You also want to document the pitch bar pressure associated with the entire speed range. Discontinue the test if at any time the pitch pressure diminishes sharply or approaches zero. Typical Vd’s for WW gliders are Alpha – 33, Falcon 4 – 40, Sport 2 – 50 (+/- 5), Sport 3 -55 (+/- 5), U2 – 60 – (+/- 5), T2/T3 – 70 -(+/- 5). VG gliders in particular have a much higher variation in top speed depending on configuration. For example, some S3s go 65 and T3s 85 with solid pitch pressure of 2-3 lbs. per hand before they reach a steady-state speed. Top speed also varies with conditions and higher speeds are often achieved only with a long run in smooth air since bumps can cause a pitch-up, and since the rate of acceleration typically slows down as one approaches Vd.
Lateral control and trim
There are a number of ways to evaluate controllability but it’s important to understand the difference between qualitative and quantitative evaluations. Quantitative might be, “what is my timed roll rate at min sink +5 mph from 30-30 bank”. Qualitative might be, “how close to the hill do I feel comfortable and confident with my control authority”. Quantitative control testing requires a bit more experience to get consistent and repeatable results because it depends on precise control inputs and more sensitivity to glider response. Qualitative evaluation is simpler in that all you have to do is isolate a particular control test and repeat it until you are confident of the outcome. Also, you should be aware of the relationship between quantitative and qualitative results. For example, the maximum roll rate between a T2 and a Falcon isn’t as much difference as you might think. The main difference is that a Falcon responds quicker and maintains a relatively uniform roll rate in response to the pilot input. At T2 is more non-linear in roll rate, with much less response to the initial input and with a much higher secondary roll-rate that often requires relaxing input to prevent overshooting the target bank.
You should identify a couple of tests that you can confidently repeat and are applicable to your flying. The most common tests that we use are sharply initiating at turn to 15 deg at minimum sink speed while looking for adverse yaw and initial turn rate, maximum-control roll-reversal from 30-30 at between min-sink and best glide (typically stall plus 5-10), and roll stability and controllability in a steady-state circling turn while thermalling. Repeat in each direction to verify symmetry. We consider a glider to have a “turn” when there is any asymmetry in response between directions. Smaller turns are only evident in differences between the way a glider responds and trims to each direction while a moderate to severe turn will manifest itself by consistently pulling to one side in straight flight. While circling, you also want to vary the airspeed especially being aware of the behavior of the glider as you approach stall speed. For example, when does the glider become more roll unstable or drop a wing and is that the same left and right?
Takeoff, landing and other flight conditions
This isn’t really a test but there are some behaviors that seem to manifest themselves only in specific situations like landing. For example, make a note if you always drop the same wing on landing flare. This can only be observed on landing because you should never perform a dynamic landing type stall at altitude. If you always drop the same wing, it could be that your arms aren’t balanced on the control bar or that the sail is too tight on one side. Try to find a well-defined and repeatable flight condition or test to evaluate changes to your glider configuration.
As a general comment, you should always have an expectation of how you and your glider are going to respond to every maneuver and condition that you encounter. It’s only by continually reviewing and evaluating personal performance and the glider response that we can hope to change and improve either. For example, did you take exactly the number of steps before getting airborne that you expected, did you land exactly where you planned, was the character of the air what you thought it would be, how close did you estimate every glide, did you get kicked out of any thermals or feel lacking in control when close to the terrain. You should get closer to matching expectations with experience, and any surprise should set up an alert to be more aware of a potential problem long before anything that could jeopardize your safety. Please read more of Mike Meier’s treatise on decision making and managing risk at /why-cant-we-get-a-handle-on-this-safety-thing/. Additional information on flight testing and abnormal glider configuration is available at /assets/uploads/tech-bulletins/TB19980810A.pdf. You should also check /tech-bulletins/ for airworthiness and other technical information associated with your glider model.
Glider Tuning 101
The following list is a brief overview of procedures and factors that are associated with configuring a glider. These notes generally apply to Wills Wing gliders and may not be appropriate for other models.
Glider symmetry, sighting and measuring
The first part of any flight evaluation is a close inspection of the glider looking for any irregularities or deviation from the design standard and factory configuration. More information is typically available in your owner’s manual available online at /support/manuals/
Batten tension (clips, springs, strings and bungees)
The most common and easily corrected configuration error in most gliders is improper batten tension. Adjust lever tips by threading them out until they are clearly too tight, then progressively loosening until the sail starts to tension about 15 degrees before locking. You can also notice when cycling the lever that small lateral wrinkles in the sail will start to disappear just before the lever locks in place. The shortest battens at the tip are typically secured with a V string tie that is prone to shrinking and becoming tighter over time. The proper adjustment is just tight enough to pull the diagonal wrinkles out of the sail but not tight enough to put a crease in your finger when engaging the string over the batten tip. Battens that are too tight seriously degrade the handling of the glider while loose battens detract from performance and contribute to premature sail flutter. I adjust my batten tension before every flight in the process of setting up because sail tension is sensitive to environmental conditions.
Leading edge tension
Refer to your glider manual for model-specific information about leading edge sail tension. In general, the handling of gliders that are stiffer and harder to control than the design standard can be improved by loosening the sail mount. Beyond a certain threshold, control authority doesn’t not improve and qualitative handling and performance deteriorate.
Wand tension and balance
Wand tension is similar to leading edge tension in that small reductions in tension by trimming the wands or moving the lever to the looser hole can dramatically improve control authority but loosening more that 3-5mm is seldom advised. Excessively tight wands can also promote sail flutter and hurt performance.
Twisting endcaps and wand height adjustment and to correct turns
The most common procedure to correct small lateral trim asymmetries (turns) is to twist the endcaps or adjust the wand height. This adjustment is covered in your owner’s manual.
Sprog settings and adjustment
Sprogs should be left at factory settings and are rarely related to control issues for the simple reason that they are typically loose and effectively disengaged until tighter VG settings. If a glider flies straight at a lower VG setting and develops a turn only with VG fully activated then it’s likely that a sprog asymmetry is contributing the turn. Sprog adjustments are generally the last adjustment to evaluate in a tuning sequence.
Bridles (and shimming)
Older gliders, especially high-performance models with long bridles supporting the outboard section of the wing, typically need adjustment for the glider to meet airworthiness standards. See /assets/uploads/tech-bulletins/TB19970702.pdf
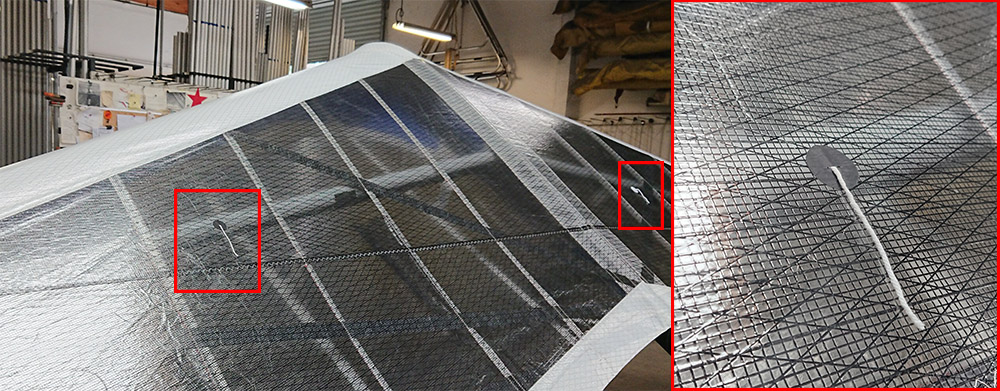
Mylar reconditioning
Gliders often develop creases in the leading edge mylar insert which can compromise trim, control, and performance, and contribute to other airworthiness problems. Any significant crease should be apparent as you run your hand down each leading-edge pocket. Mylar inserts can be reconditioned by rolling them to 4-6 inch diameter, covering with foil and heating in an oven for 2 or more hours at 210F (100C). Always replace them in the same side.
Nose cone security
Check that your nose cone is secure and without gaps on the perimeter. If it’s loose, tighten the string tether at the apex or replace the Velcro on older models.
Keel pocket tension (pitch pressure and BS tension)
The proper adjustment for the keel pocket strap on most Wills Wing models in ¼ to ½ inches of slack at VG loose, measured by displacing the strap fore and aft on the keel tube surface.
Shear ribs and Velcros
Verify that your shear ribs are zipped closed, and that the Velcro straps between the top and bottom surface are secure and adjusted to the factory registration lines. Unzipped ribs and loose shear Velcros often reduce pitch pressure and longitudinal stability
Batten symmetry
Match your battens from side-side every 10 flights, if you have a bad landing or before you make any other adjustments to correct for a turn.
Pre-flight, maintenance and annual inspection
Gliders need routine maintenance to retain the performance, handling and airworthiness of new. Your owners manual is a starting point, and additionally you should consider a comprehensive inspection including sail removal every 100 hours or 2 years.
Understanding and using the VG effectively
The VG system is a very effective mechanism for optimizing the configuration of your glider in-flight. Make sure the it’s working properly and is configured to access the full design travel from loose (with the sweep wire tight) to tight
Sail material, inspection, care, and repair
Hang gliders are membrane wings that depend on the structural properties (stiffness and strength) of sailcloth for performance, handling and airworthiness. This material is easily damaged and compromised by UV deterioration, transport and other wear factors. Most modern sailcloth can remain airworthy with good conformance to the design specifications for 400 to 1000 hours or more of airtime with good care. Pack your glider up promptly after landing and never leave it set up for extended periods in the sun. Leave the airframe VG loose with the wands removed if you leave it set up in an enclosed structure. Transport it only on a well-padded rack with secure tie-downs and without support under hardware junctions. Keep an eye out for any developing wear areas and adjust your packing procedures accordingly. Inspect grommets and webbing supports as part of your preflight and repair them at the first sign of damage. If your sail develops flutter at the trailing edge, have it repaired at your earliest convenience because it will irreparably damage the material in very little time.
Raked tips installation
Raked tips typically have a small effect on the performance and handling of gliders at low speeds. It’s important that the tips are designed and flight tested for the associated model or they can cause undesirable flight characteristics. If your glider has tips, make sure that they are installed and secured according to the factory procedure. For example, the tips for T2Cs include carbon rods that must be overlapped into the sail behind the wand to prevent flutter and roll excursions in high speed flight.
Difference between routine tuning and developmental flight testing
There’s a difference between the flight testing and evaluation that is involved in product development and fine-tuning your personal glider. A production glider has already been evaluated by factory pilots to verify that it complies with the design standard. That doesn’t mean that it’s optimally configured or trimmed to your personal preferences, only that the flight characteristics are consistent with the model type and configuration. As discussed above, membrane wings are very sensitive a multitude of variables including environmental conditions, pilot weight, material properties, glider age and condition, every tuning parameter mentioned above and more. That variation and uncertainty is both a challenge to manage and an opportunity for improvement. In my experience, new gliders never meet their potential for performance and handling until the sail has 50-100 hours of airtime and small adjustments have been made to the tuning parameters. Unfortunately, it’s equally possible the flight characteristics of a glider will continually deteriorate from the as-new condition without basic tuning and maintenance. The answers to specific tuning questions are often hard to identify or prescribe but equally self-evident after a simple glider inspection and flight test. This guide is intended as in introduction to the flying skills and variables associated with optimizing the performance of your wing and improving your flying experience.